Save
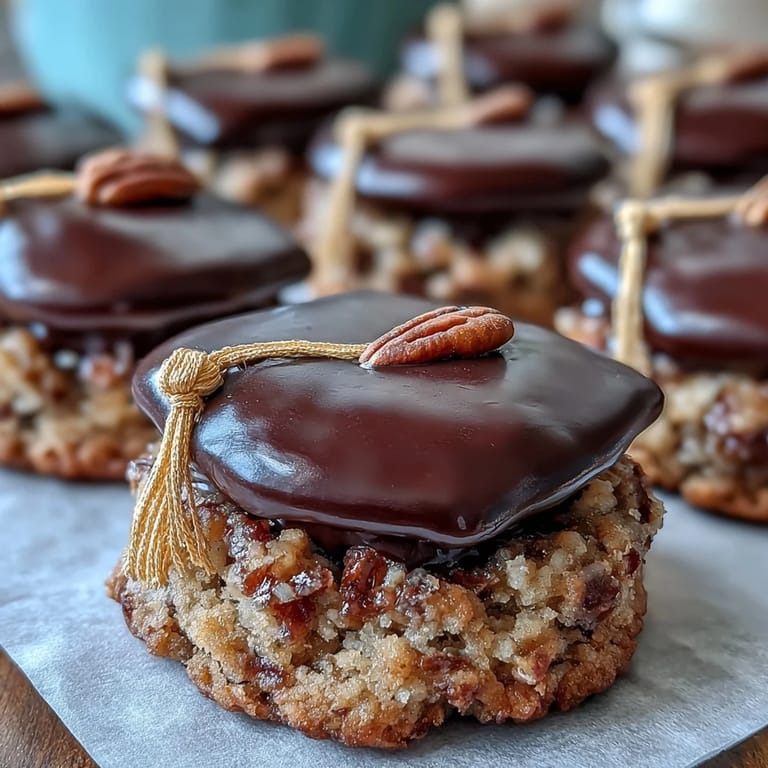
Save My friend texted me a photo of her daughter in a cap and gown, and I immediately thought about making something special to celebrate. These graduation cap cookies came to life on my kitchen counter one afternoon when I realized that the simplest sugar cookie base could transform into something genuinely festive with a little royal icing artistry. The first batch looked a bit wonky—my piping wasn't steady and the black icing pooled in weird places—but somehow that made them feel more personal, more real. Now whenever I make them, I think about how perfectly they capture that moment of achievement, one sweet bite at a time.
I made these for my coworker's son's graduation party, and watching people's faces light up when they realized the cookies were shaped like actual caps was worth every minute of piping work. One guest asked for the recipe before even finishing the first cookie, which felt like the highest compliment.
Ingredients
- All-purpose flour (2 1/2 cups): The foundation of a tender, crisp cookie—sifting it first helps avoid dense results.
- Unsalted butter (3/4 cup, softened): Softening the butter properly (leave it on the counter, don't rush it) makes creaming with sugar infinitely easier.
- Granulated sugar (1 cup): This sweetness paired with the buttery base creates that perfect cookie texture that balances crispy edges with a tender center.
- Large egg (1): Binds everything together and adds richness without overpowering the delicate vanilla flavor.
- Vanilla extract (2 teaspoons): A splash of real vanilla makes these taste homemade in the best way possible.
- Baking powder (1/2 teaspoon) and salt (1/4 teaspoon): These humble ingredients lift the cookies slightly and enhance the buttery vanilla notes.
- Powdered sugar (3 cups, sifted): Use fresh powdered sugar and always sift it to avoid lumpy icing.
- Egg whites or meringue powder (2 large egg whites or 4 tablespoons meringue powder with 6 tablespoons water): Meringue powder is the safer choice if you're worried about raw eggs, and it works beautifully.
- Black and yellow gel food coloring: Gel coloring is more vibrant than liquid and won't thin your icing like water-based versions do.
- Mini yellow M&Ms or candy pearls: These tiny tassels are the finishing touch that makes the caps feel authentic and celebratory.
Tired of Takeout? 🥡
Get 10 meals you can make faster than delivery arrives. Seriously.
One email. No spam. Unsubscribe anytime.
Instructions
- Gather and prep your ingredients:
- Whisk together your flour, baking powder, and salt in a small bowl so everything blends evenly into the dough.
- Cream butter and sugar together:
- Beat softened butter and sugar on medium speed for about 2 to 3 minutes until the mixture is light, fluffy, and noticeably pale—this is where the magic starts. If you skip this step or rush it, your cookies will be denser than they should be.
- Add the egg and vanilla:
- Mix them in until fully combined, scraping down the sides of the bowl to ensure everything is evenly incorporated.
- Bring the dough together:
- Add your flour mixture gradually, stirring on low speed until the dough just comes together—don't overmix or your cookies will be tough.
- Chill the dough:
- Divide the dough in half, shape each into a disk, wrap in plastic wrap, and refrigerate for at least 30 minutes so it's easier to work with.
- Heat your oven and roll the dough:
- Preheat to 350°F while you roll out your chilled dough on a lightly floured surface to about 1/4-inch thickness. A bench scraper or dough scraper here prevents sticking better than a knife.
- Cut your graduation caps:
- Use a graduation cap-shaped cutter if you have one, or a simple square cutter works just as well and looks elegant in its own way.
- Bake with precision:
- Arrange cookies on parchment-lined baking sheets and bake for 8 to 10 minutes until the edges are just barely golden—watch for that moment carefully because the difference between underbaked and overdone is just a minute or two.
- Make your royal icing:
- Beat egg whites or meringue powder mixture until foamy, then gradually add sifted powdered sugar while beating on medium-high speed for about 5 minutes until stiff, glossy peaks form. This is where arm strength or a stand mixer becomes your best friend.
- Divide and color your icing:
- Set aside a small amount of white icing for optional highlights, tint the majority black, and tint a separate portion yellow using gel food coloring, starting with just a tiny dab since the colors are concentrated.
- Adjust the consistency:
- For flooding (covering the whole cookie smoothly), your icing should flow slowly when you move the piping bag; for piping details, it should hold its shape immediately. Add water by the teaspoon or extra powdered sugar as needed.
- Outline and flood with black icing:
- Using a piping bag fitted with a small round tip, outline the edges of each cookie with black icing, then thin the consistency slightly and fill the interior by gently piping and using a toothpick to nudge the icing toward the edges. Let this set for 30 to 60 minutes until it's completely dry and firm.
- Pipe the yellow tassel and button:
- Once the base is set, use yellow icing in a piping bag to create a small tassel shape hanging from the top corner of the cap and a button where the tassel connects. Your piping doesn't need to be perfect—slight variations actually make them look more handmade and charming.
- Add the final candy touch:
- Place a mini M&M or candy pearl at the end of each tassel while the yellow icing is still slightly tacky so it adheres well.
- Let them dry completely:
- Allow several hours or ideally overnight for the icing to fully harden before stacking, storing, or packaging as gifts.
 Save
Save There's something deeply satisfying about holding up a cookie that looks like a real graduation cap, knowing you made every single detail. These aren't just cookies—they're edible congratulations, and the person receiving them knows you took the time to make something thoughtful.
Timing and Make-Ahead Tips
The beauty of this recipe is its flexibility. Bake the cookies up to two days ahead and store them in an airtight container at room temperature, then decorate the day before serving or even the morning of the event. The royal icing actually sets firmer if you let the cookies sit overnight, which makes them even better for transportation. If you're short on time, you can also bake and decorate all in one day, but give yourself a solid two hours minimum for cooling and icing to set properly.
Troubleshooting Common Decorating Moments
My first attempt at piping the tassel was a disaster of yellow icing spiraling everywhere, so I learned some hard truths. If your icing is too thin, it will run off the sides of the cookie no matter how careful you are, so test consistency on a spare cookie first. If it's too thick, your piping bag will require uncomfortable amounts of pressure and your lines will look choppy. A toothpick is honestly your secret weapon for fixing imperfect icing—gently nudge it where you need it to go before it fully sets. And if a cookie truly looks unsalvageable mid-decoration, remember that you can let the icing dry, pipe over it, or just accept that imperfect cookies taste just as good.
Storage and Gifting Ideas
Once the icing is completely dry, these cookies stay fresh in an airtight container at room temperature for up to five days, though they're honestly best eaten within the first three. Stack parchment paper between layers to prevent any icing smudging, and if you're shipping them somewhere, pack them carefully with bubble wrap or packing peanuts since the icing can chip if they're jostled too much. They also photograph beautifully, so if you're celebrating digitally first, the cookies make for incredibly shareable content that feels personal and homemade in the best possible way.
- Store decorated cookies in a cool, dry place away from humidity, which can soften the icing.
- If gifting, consider placing them in a pretty box with tissue paper for that extra special touch.
- Make sure the icing is completely hard before stacking or wrapping to avoid any smudging or damage.
 Save
Save These cookies are pure celebration in edible form, and making them is just as much fun as eating them. Every batch reminds me that the most meaningful treats come from the care you put into them, not from how perfect they look.
Kitchen Guide
- → What type of flour is best for these cookies?
All-purpose flour is used to create a tender yet sturdy cookie that holds its shape well during baking and decorating.
- → How do I achieve smooth royal icing consistency?
Beat egg whites or meringue powder with powdered sugar until stiff peaks form, then adjust with water by teaspoonfuls for flooding or more sugar for piping.
- → Can I prepare the cookies ahead of time?
Yes, cookies can be baked up to two days in advance and decorated the day of serving for best results.
- → What alternatives exist for gel food coloring?
Natural food colorings such as beet juice or turmeric powder can be used in place of gel colors for a more natural approach.
- → How should I store decorated cookies?
Once fully dry, store cookies in an airtight container at room temperature to maintain crispness and decoration quality.